
How to Test a Travel Backpack at Home Before the Return Window Closes
A return-safe, room-by-room test that reveals fit, capacity and airline problems before they become travel problems.
A new travel backpack can feel impressive for the first two minutes: the zips are crisp, the compartments look organised and the harness seems padded. The real problems usually appear later, once the bag is packed, the hip belt is positioned and you have climbed stairs or stood in a queue for half an hour.
The safest way to test a travel backpack at home is to use a controlled routine while the bag is still clean and returnable. The key is to copy the load and movements of a travel day without treating the backpack more harshly than you reasonably could in a shop. UK distance-selling rules allow inspection, but a retailer may reduce a refund if handling goes beyond what is necessary to establish the product’s nature, characteristics and function. [5][6]
This guide uses current fitting advice from Osprey, Deuter, Gregory and Cotswold Outdoor, current UK consumer guidance, live airline allowances and representative travel-pack specifications. Prices, product details and policies were checked on 20 September 2026; always keep the seller’s own deadline and conditions as the controlling terms.
30–60 minute indoor carry
Short try-ons miss pressure, heat and movement problems that emerge after the load settles.
Torso length
Backpack size is based on the distance from the C7 vertebra to the iliac crest, not clothing size or height alone.
Packed dimensions
Measure the bag after loading and compression; litres do not prove compliance with an airline limit.
Keep it clean and tagged
Use clean indoor floors, retain packaging and avoid outdoor wear, water tests or destructive stress before deciding.
Read the seller’s rules first
Record the delivery date and the last date for notifying the seller. Keep the order email, return instructions, tags, dust bag, plastic sleeves, cardboard inserts and shipping carton. Photograph the backpack on arrival, including any marks, so a pre-existing issue is documented.
For most UK online purchases, the statutory cancellation period ends 14 days after you receive the goods. After telling the seller, you normally have another 14 days to send them back. However, the law permits a deduction if handling goes beyond what would reasonably be allowed in a shop. [5][6][7] A retailer may offer a longer commercial period, but its condition rules still matter.
Keep the test shop-like
- Test on clean indoor floors while wearing clean clothing.
- Keep paper tags attached unless the seller explicitly permits removal.
- Use folded clothes, packing cubes and protected household items as the load.
- Do not take the bag outside, drag it, wet it, machine-wash it or stress seams to failure.
- Avoid food, toiletries that can leak, pens without caps and loose metal weights.
- Place a clean sheet or mat beneath the bag when packing and measuring.
Find the C7 vertebra and iliac crest
Osprey and Gregory size adult packs by torso length. Their method starts at the prominent C7 vertebra at the base of the neck and ends at the level of the iliac crest, the top of the hip bones. [1][3] Ask another person to measure with a flexible tape while you stand naturally. Height and clothing size are poor substitutes because people of the same height can have different torso lengths.

Check the product’s actual fit range
Look for the manufacturer’s torso range, harness adjustment and hip-belt range. “One size” does not mean every body. Osprey, for example, publishes different torso ranges for men’s, women’s and unisex fit profiles and notes that product-specific sizing can vary. [1] If your measurement sits at the edge of a range, test the neighbouring size where available.
Measure the bag empty and packed
Record height, width and depth at the widest points. Then repeat after packing and tightening compression straps. Soft bags bulge around shoes, packing cubes and laptops, so the listed factory dimensions are only the beginning. Include fixed handles, strap keepers and any pocket that remains full.
Copy the trip, not an arbitrary weight
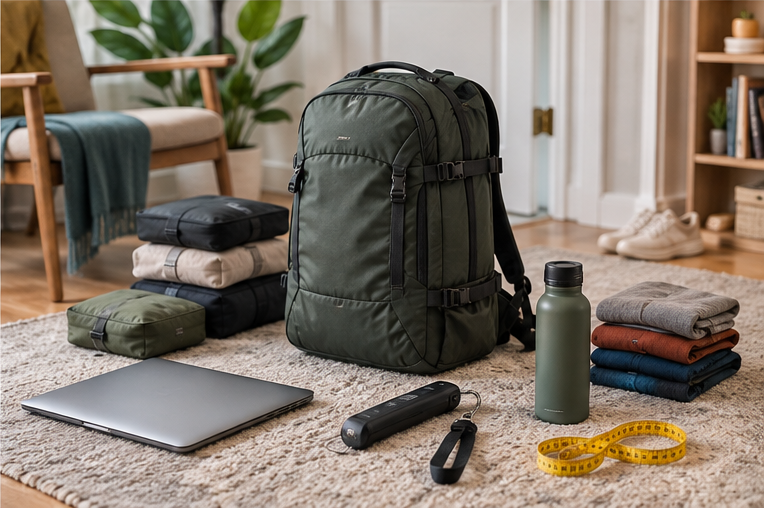
Pack the clothing, laptop, charger, wash bag, footwear, bottle and small accessories you expect to carry. If an item is not yet available, substitute something soft with similar size and mass. The aim is to recreate bulk distribution as well as total weight.
Start with a lighter load to adjust the harness, then move to the realistic load. Do not exceed the manufacturer’s stated load range. The current Osprey Farpoint 40, for example, publishes a 7–16 kg load range; that figure applies to that pack and should not be copied to a frameless bag. [12]
Place dense items close to your back
Keep a laptop, electronics and other dense items close to the back panel and centred left to right. Fill voids so the load cannot slump. A badly packed bag can imitate poor fit by pulling backwards or twisting, while an overstuffed front pocket can make a sound harness feel unstable.
- Weigh the empty pack and the complete load separately.
- Photograph the layout so competing backpacks can be packed the same way.
- Test with and without the laptop if some trips will be leisure-only.
- Use the same coat or travel clothing for every comparison.
- Keep a one-page load list beside the return deadline.
Loosen first, then build the fit from the hips up
Deuter advises loosening all straps before shouldering a realistically loaded pack, then placing the hip fins over the top of the hip bones, tightening the shoulder straps without transferring the whole load to them, setting the sternum strap and finally tuning the stabiliser straps. [2] Cotswold Outdoor gives the same practical priority: hip belt first, shoulder straps second and load lifters last. [4]
- Loosen shoulder straps, load lifters, sternum strap and hip-belt stabilisers.
- Lift the pack using its haul handle and settle it high enough for the hip belt to wrap the iliac crest.
- Tighten the hip belt until secure without pinching or restricting movement.
- Pull the shoulder straps until they follow the shoulders without carrying all the load.
- Tighten load lifters only enough to bring the upper pack closer; do not crank them hard.
- Set the sternum strap at a comfortable height and tighten it without restricting breathing.
- Tuck loose webbing temporarily so it does not confuse the movement test.
Travel packs vary in harness ambition
A suitcase-style travel backpack may have stowable shoulder straps and a modest hip belt, while a trekking-influenced model may use an adjustable torso and load-bearing frame. Judge the bag against its intended carry time. A minimal belt can be acceptable for airport-to-taxi movement but disappointing for a 40-minute city walk.
Check contact before starting the longer carry
Use a mirror and, where possible, a helper. The shoulder straps should wrap smoothly over the shoulders rather than bridging above them or cutting into the neck. Gregory advises that the top edge of the hip belt should sit around an inch above the hip bones and that the shoulder straps should follow the shoulders and upper back. [3] Body shapes differ, so comfort and manufacturer guidance both matter.
| Area | Healthy starting sign | Adjustment to try | Return-size warning |
|---|---|---|---|
| Hip belt | Wraps the hip bones and stays level | Move the pack slightly higher or lower; retighten | Cannot grip without crushing the waist or sliding |
| Shoulder straps | Smooth contact without neck pressure | Change torso length; retighten from loose | Large gap, hard edge or persistent hotspot |
| Load lifters | Bring the top of the pack closer with moderate tension | Alter the anchor setting if provided | Must be fully tightened to control the pack |
| Sternum strap | Keeps straps positioned without limiting breath | Move up or down; use light tension | Strap sits at the throat or distorts the harness |
| Head clearance | You can look up and turn freely | Repack high items; adjust torso | Pack repeatedly hits the head or blocks movement |
Move before you wait
Walk, turn, look over both shoulders, reach forward, bend slightly at the knees and sit down. A pack can feel fine while standing motionless and shift as soon as the hips rotate. Cotswold Outdoor specifically recommends walking, bending, turning and stepping because fit problems often appear only in motion. [4]
Use the rooms and movements you already have
After the ten-minute screen, keep the realistic load on for at least another 20 minutes. Thirty minutes is a useful minimum; up to an hour gives heat and pressure more time to emerge. Stay indoors and avoid anything that can mark the bag.

- Walk repeated laps at normal pace and include several tight turns.
- Climb and descend a safe flight of stairs using the handrail.
- Stand still for five minutes as if waiting at security or a platform.
- Sit on a dining chair and a lower sofa; check whether the pack forces an awkward posture.
- Pass through the narrowest safe doorway and turn in a hallway without striking walls.
- Take the pack off and put it on again three times using the intended haul handle.
- Simulate an overhead lift with an empty or safely controlled shelf; never risk dropping a heavy pack.
- Repeat part of the route in the coat or jacket you will wear in transit.
Record how discomfort changes with time
A firm new harness is not necessarily a problem, but discomfort should not escalate into sharp pain, numbness, tingling or restricted breathing. Stop the test if those occur. Note the minute when warmth, pressure or slipping appears, then try one deliberate adjustment. If the same issue returns, the bag may be wrong rather than merely misadjusted.
Litres are not an airline allowance
Two 40-litre backpacks can have different proportions, and a soft bag can become deeper than its stated size. Measure after packing, closing all zips and tightening compression straps. If shoulder straps stow, test the stowed configuration. If they do not, keep loose webbing secured so it cannot snag during sizing or boarding.
Current UK-airline examples
The table provides current examples checked on 20 September 2026, not a universal standard. Your booking and operating carrier control the allowance.
| Airline / allowance | Maximum dimensions | Weight point | Home-test implication |
|---|---|---|---|
| Ryanair small personal bag | 40 × 30 × 20 cm | Must fit under the seat | Many 35–45 L travel packs are too large even if lightly packed [10] |
| Ryanair Priority second cabin bag | 55 × 40 × 20 cm | 10 kg | Depth is the common failure point; measure bulge at the fullest pocket [10] |
| easyJet small cabin bag | 45 × 36 × 20 cm including handles and wheels | Up to 15 kg; passenger must lift it | Test under-seat proportions and a safe self-lift [9] |
| easyJet large cabin bag | 56 × 45 × 25 cm including handles and wheels | Up to 15 kg; passenger must lift it | Many travel packs fit by size, but the fare must include the bag [9] |
| British Airways cabin bag | 56 × 45 × 25 cm including wheels and handles | Passenger must lift it unassisted | Check the operating carrier and practise a controlled lift [8] |
Run the airport sequence
Pack the laptop, liquids bag, passport, phone, charging cable, water bottle and one layer where you intend to carry them. Start with the pack closed, then time a realistic sequence: retrieve the laptop, remove liquids, put both away, find travel documents and add the layer. Speed is less important than whether the process is calm and does not spill the main compartment.
A rear laptop sleeve may keep dense weight close to the back but can be awkward when the bag is under a seat. A front pocket is easy to reach but can pull the centre of gravity away from you. Therefore, organisation should be judged with the bag loaded and worn, not from photographs of empty compartments.
Test every mode the product promises
- Open a clamshell design on a bed-sized surface and on a narrow bench-sized surface.
- Stow and redeploy shoulder straps without removing packed items.
- Use the side and top handles with the full load.
- Attach the bag to a suitcase handle if a trolley sleeve is included.
- Check whether a full bottle pocket interferes with compression straps.
- Confirm lockable zip sliders meet cleanly without straining the fabric.
- Insert the actual laptop, including its case, rather than relying on screen-size marketing.
Heat is expected; concentrated heat is informative
Most backpacks warm the back to some degree. Compare whether warmth is spread evenly or concentrated beneath a frame edge, lumbar pad or laptop corner. Repeat part of the test with a thin top and with your travel layer because clothing changes pressure and friction.
Look for patterns, not one fleeting sensation
| Observation | Possible cause | One controlled retest | Keep / return implication |
|---|---|---|---|
| Shoulder numbness or sharp pressure | Hip belt not carrying load, wrong torso or strap shape | Reset from fully loose; move dense items closer | Return if it recurs promptly |
| Hip belt slides down | Belt shape or range does not match the body; load too rearward | Reposition over the iliac crest; centre the load | Return if secure fit needs painful tension |
| Pack sways on stairs | Loose load, weak compression or poor torso match | Fill voids; retighten compression and stabilisers | Return if sway remains with correct packing |
| Lower edge rubs | Back length too long or pack sits too low | Shorten torso setting; reset hip belt | Try another size if adjustment cannot solve it |
| Neck contact | Harness too narrow or high, or pack overfilled at the top | Lower sternum strap; repack the top section | Return if normal head movement remains restricted |
Use light, close inspection
Open every zip through its full normal path, buckle and release each clip, and adjust each strap. Look for skipped stitches, loose thread tails that are growing, exposed foam, uneven bartacks, twisted webbing and hardware that is mounted asymmetrically. Run a fingertip around the frame-sheet edge and laptop sleeve to detect sharp pressure points.
Do not yank handles, overfill compartments or hang the bag from one strap to “prove” strength. A return-safe inspection is intended to reveal manufacturing issues during normal operation, not create damage.
Check symmetry under load
- Both shoulder straps should emerge at the same height and angle.
- The hip belt should wrap evenly without one wing bottoming out first.
- Compression straps should pull the load centrally rather than twisting the front panel.
- Zips should run without fabric repeatedly catching at the same point.
- The bag should stand or lie as the design intends without a rigid frame edge pushing through.
Score the decisions that matter on your trips
A backpack can win on organisation and still fail because the hip belt slips. Use vetoes for non-negotiables, then score the remaining categories. A simple 0–5 scale works: 0 means unusable, 3 means acceptable with a compromise and 5 means excellent for your needs.
| Category | Weight | Questions | Automatic return trigger |
|---|---|---|---|
| Fit and pressure | 30% | Does the harness remain comfortable and stable for the full circuit? | Sharp pain, numbness, restricted breathing or unfixable belt slip |
| Airline compliance | 20% | Does the packed bag fit the allowances you actually buy? | Exceeds a non-negotiable limit when realistically packed |
| Carry control | 15% | Can you climb stairs, turn, sit and stand without sway? | Unsafe instability or repeated loss of balance |
| Access and organisation | 15% | Can you complete the airport sequence without unpacking? | A critical item or laptop cannot fit safely |
| Capacity and packing shape | 10% | Does the real trip load fit without damaging bulge? | Requires leaving essential items or overstuffing |
| Construction and warranty | 10% | Are normal operations smooth and is support credible? | Defect, asymmetry or unacceptable return or warranty terms |
Set the decision before emotion takes over
A sensible rule is to return the bag for any automatic trigger, or when the weighted score is below your pre-set threshold. For example, 75 out of 100 may be acceptable for an occasional airport bag, while a long-carry one-bag traveller may demand 85 and no comfort score below 4.
Specifications guide the test; they do not replace it
These current packs illustrate different test priorities. They are not ranked and no comfort result is claimed. Prices and specifications were checked on 20 September 2026.
| Pack | Published size / weight | Current price | Feature that changes the home test | Airline caveat |
|---|---|---|---|---|
| Osprey Farpoint 40 | 55 × 35 × 23 cm; 1.48 kg; 40 L | £170 [12] | Adjustable torso, frame, hip belt and 7–16 kg load range require a full harness test | Fits many large-cabin limits but exceeds Ryanair’s 20 cm depth on paper |
| CabinZero Classic Pro 42L | 54 × 35 × 20 cm; 1.434 kg; 42 L | £110 [13] | Stowable harness, padded waist belt, trolley sleeve and 17-inch laptop claim need mode-by-mode testing | Dimensions align with several 55 × 40 × 20 cm limits; packed bulge still matters |
| Patagonia Black Hole MLC 45L | About 56 × 37 × 19 cm; 1.635 kg; 45 L | £200 [14] | Backpack, shoulder-bag and duffel modes plus a dual-purpose hip belt should all be tested | Length reaches 56 cm, so compare the exact carrier and orientation |
Manufacturer language such as “meets most carry-on requirements” is not a guarantee for your fare. Compare the packed bag with the operating airline’s current rules.
Day one: document, measure and adjust
- Photograph the arrival condition and save the return deadline.
- Measure torso length, hip position and empty bag dimensions.
- Pack the standard test load and record weight and packed dimensions.
- Adjust the harness from fully loose and complete the ten-minute screen.
- Run the airport-access sequence and note any packing changes.
Day two: repeat under different clothing and decide
- Repack from the photograph so the load is consistent.
- Complete the 30–60 minute circuit in a thin layer.
- Rest, then repeat key movements in the jacket or coat used for travel.
- Inspect zips, seams, symmetry and strap slippage.
- Complete the scorecard, compare with the return threshold and act before the deadline.
- Uses your body, clothing, laptop and real trip load.
- Reveals discomfort that a brief shop try-on can miss.
- Lets competing packs follow the same route and scorecard.
- Checks airline dimensions after realistic packing.
- Protects the decision from marketing claims and empty-bag impressions.
- Cannot reproduce a full day, hot climate or outdoor terrain without risking return condition.
- Home stairs and shelves may not match aircraft or stations.
- A return deadline can encourage rushed judgement.
- Poor packing can make a suitable harness feel wrong.
- Retailer conditions may limit how far a change-of-mind test can go.
Avoid these false positives and false negatives
- Removing tags and discarding packaging before checking the return policy.
- Trying the pack empty or with a random dumbbell instead of a real packing layout.
- Sizing from height or T-shirt size rather than torso length and product range.
- Tightening shoulder straps first and leaving the hip belt decorative.
- Judging comfort after two minutes instead of allowing pressure and heat to develop.
- Comparing litre capacity with airline rules instead of packed external dimensions.
- Testing only in a thin top when the trip requires a coat—or the reverse.
- Changing several straps and packing positions at once, then guessing what helped.
- Taking the backpack outdoors or wetting it before the keep-or-return decision.
- Keeping an uncomfortable bag because the pockets, colour or discount are appealing.
How long should I test a travel backpack at home?
Use a ten-minute fit screen followed by a 20–50 minute indoor circuit. Thirty to sixty minutes total is long enough for many pressure, heat and stability issues to appear without taking the bag outside.
How much weight should I put in the backpack?
Use the realistic load for your trip and stay within the manufacturer’s stated load range. Copy both weight and bulk; do not use loose metal weights that can damage the bag.
Can I remove the tags while testing?
Keep them attached unless the seller’s policy clearly permits removal. Tags, inserts and packaging help preserve return eligibility and simplify repacking.
Where should the hip belt sit?
For a load-bearing travel pack, the padded belt should wrap the top of the hip bones rather than sitting loosely around the waist. Product design and body shape vary, so follow the manufacturer’s fit guide.
How do I know the torso length is wrong?
Warning signs include a hip belt that sits correctly only when shoulder straps gap or pinch, load lifters with unusable angles, the lower edge rubbing, or the pack striking the back of the head.
Should the shoulder straps carry the backpack weight?
They should stabilise the pack and share some load, but a functioning hip belt is intended to transfer a substantial part to the hips. Excessive shoulder pressure often signals adjustment or fit trouble.
Can a 40-litre backpack be used as hand luggage?
Sometimes, but capacity is not an airline measurement. Compare the packed height, width and depth with the exact fare and operating carrier. A soft 40-litre bag can exceed its listed depth when overfilled.
How should I test an overhead lift?
Use a controlled, safe indoor simulation. Keep the path clear, use an appropriate shelf height and reduce the load if necessary. The aim is to check grip and technique, not reproduce an aircraft bin exactly.
What discomfort means I should return the pack?
Sharp pain, numbness, tingling, breathing restriction, persistent hip-belt slip or a hotspot that quickly returns after correct adjustment are strong reasons to stop and try another fit.
Can I test water resistance before returning it?
Avoid shower, hose or immersion tests before the keep-or-return decision unless the seller explicitly allows them. Water can mark materials, affect coatings and make the item non-returnable.
Do I have to return an online purchase in the original packaging?
UK guidance says original packaging is not always legally required, but the item must be protected and retailer terms can matter. Keeping all packaging is still the safest practical approach.
Should I buy two sizes and return one?
Only when the retailer permits that approach and you can protect both items. Use the same load, route and scorecard so the comparison is fair, then return promptly and carefully.
Keep the pack only when the loaded version works
A travel backpack should pass three non-negotiable tests: it fits your torso and hips without escalating pressure, it remains controlled through normal indoor movements, and its realistic packed dimensions suit the airlines and fares you use. Organisation, colour and price come after those basics.
Use a 48-hour process where the return period allows it. Document the condition, preserve the packaging, test the actual load, adjust from the hips upward, carry for 30–60 minutes and repeat key movements in different travel clothing. Then use the scorecard rather than relying on first impressions.
Return the bag when comfort depends on extreme strap tension, the hip belt cannot stay on the iliac crest, the pack shifts on stairs, a critical laptop or access need fails, or the packed shape misses a non-negotiable airline limit. Those are design mismatches, not problems to solve on the first travel day.
- Osprey — Backpack Size Charts and GuideTorso-length measurement method, fit profiles and product-specific sizing caveat.
- Deuter — How to Adjust a BackpackRealistic loaded fitting sequence, hip-fin placement, strap order and stabiliser guidance.
- Gregory — Pack Fit GuideTorso measurement, loaded try-on, hip-belt and shoulder-strap position.
- Cotswold Outdoor — Rucksack Fitting GuideMovement testing, fit order and packing close to the back.
- GOV.UK — Accepting Returns and Giving RefundsCurrent UK overview of online cancellation, return timing and shop-like handling.
- Consumer Contracts Regulations 2013 — Regulation 34Statutory wording on reimbursement and diminished value from excessive handling.
- Consumer Contracts Regulations 2013 — Regulation 30Statutory 14-day cancellation period for sales contracts.
- British Airways — Baggage EssentialsCurrent cabin dimensions and self-lift requirement.
- easyJet — Cabin BagsCurrent small and large cabin-bag limits, weight and self-lift requirement.
- Ryanair — Bag PolicyCurrent personal-bag and Priority cabin-bag dimensions and weight.
- IATA — Passenger Baggage RulesGeneral reminder that allowances vary by airline, route, cabin and aircraft.
- Osprey UK — Farpoint 40 Travel BackpackCurrent dimensions, weight, load range, harness features and UK price.
- CabinZero — Classic Pro Backpack 42LCurrent dimensions, weight, capacity, harness features, returns and UK price.
- Patagonia UK — Black Hole MLC 45LCurrent dimensions, weight, capacity, carry modes and UK price.
- Citizens Advice — Changing Your Mind About Something You BoughtPractical UK guidance on cancellation notice, return timing, packaging and proof of posting.
Illustrations in this article were created for Travel Gear. Third-party photographs, where used, are credited beside the image or in the source list.